Monday, September 28, 2020

Composition

 This week we were given a set of models and tasked with creating a piece using one of the different composition types. After looking at Star Wars concept art for inspiration, I decided I wanted to go with an orange/blue color palette, and have a traditional/retro vibe.


Inspiration

I created a radii composition and placed my models mostly in the foreground and midground and used a photogrammetry capture of a diorama of the Star Wars Galaxy's Edge theme park area by Reverse Imagineering in the background. I color shifted the diorama's texture in Photoshop to match my color palette and applied basic colored materials to my models using aistandard shaders with aiambientOcclusion connected into the base parameter.

Location of Given Models

Radii Composition

I brought in the beauty and AO render passes into Photoshop and used the ID pass for masking. I created masks to blur the midground and background slightly, and adjusted the brightness and contrast. Then, I merged the layers, and with the foreground and background colors set to different reddish-purple shades went into the Filter Gallery and applied the Paint Daubs, Palette Knife, and Conte Crayon filters. Then, I duplicated the original render on top as a Color blending mode and smudged out artifacts from the photogrammetry. Then I applied black and white gradients for lighting.

Base with Blur

Apply Filters

Color Blending Mode

Add Light

Final


Saturday, September 26, 2020

Crate Part 01: Proxy Geometry

 This week we started making a game-ready crate asset. To begin, I brought the UE4 Mannequin into Maya as a scale reference and modeled my proxy geometry. Then, I imported the proxy crate into Unreal.


Scale Reference

Proxy Crate

Proxy Crates in UE4


Then, using extruding, beveling, and vertex manipulation, I modeled the base for a higher-resolution mesh and combined pieces in preparation to export and bring into ZBrush.

Crate Modeled


Export Ready


Thursday, September 24, 2020

Basic Lighting

 This week we created a 3-point lighting setup to render models with. I set up an infinity wall with an area light as a key light, dome light as a fill light, and a point light as a rim light.


Lighting Setup


Then, I set up cameras for rendering the models.


Render Camera


I applied a material to the models made by plugging an aiAmbientOcclusion shader into the base color of an aiStandardSurface shader. Then the models were rendered using Arnold.


Material Applied to Models


Given Sculpts Rendered


Lego Project from 3D Art Rendered


Monday, September 21, 2020

Legos Part 02

 For this week, we finished up the lego project by assembling the legos we modeled in Unreal into both the ship and an additional unique creation, making blueprints from the creations, and then creating renders to showcase them.

First, I assembled the pieces in a new level in Unreal. Then, I created an opaque material and a translucent material, and material instances for the different colors and applied them to the model. Then I converted the pieces to a blueprint.


Pieces Assembled

Materials Created


Materials Applied and Combined Into Blueprint

After the blueprint was created, I made a graph so the pieces would rotate in place like a turntable.

Blueprint Graph

Then I imported in an infinity wall, set up the lighting and effects (reflection capture, exponential height fog, reflection plane, post-process volume), and rendered out stills and sequences of the creations.


Thursday, September 17, 2020

Week 03 Values/Contrast

 This week, we had to use various render passes of a composition of a truck and mannequins to create an illustration in Photoshop. I used the normal, depth, AO, ID, and toon line renders, pictured below.

AO Render

ID

Normal

Toon Line

ZDepth

I decided on going for a retro neon 80's vibe, using these pictures as inspiration.


Inspiration


I created the base of my piece using a black and white version of the normal map, with the green channel of the normal map overlayed on top. I then adjusted the levels.


Base layers and result

Then, I added color using masked gradient maps, using the ID render to grab the selections. Some glow for the lights and blurs were also added.


Colors added

I added shading by using the AO pass filled with a solid color and black and white gradients all set to multiply.

Shading added

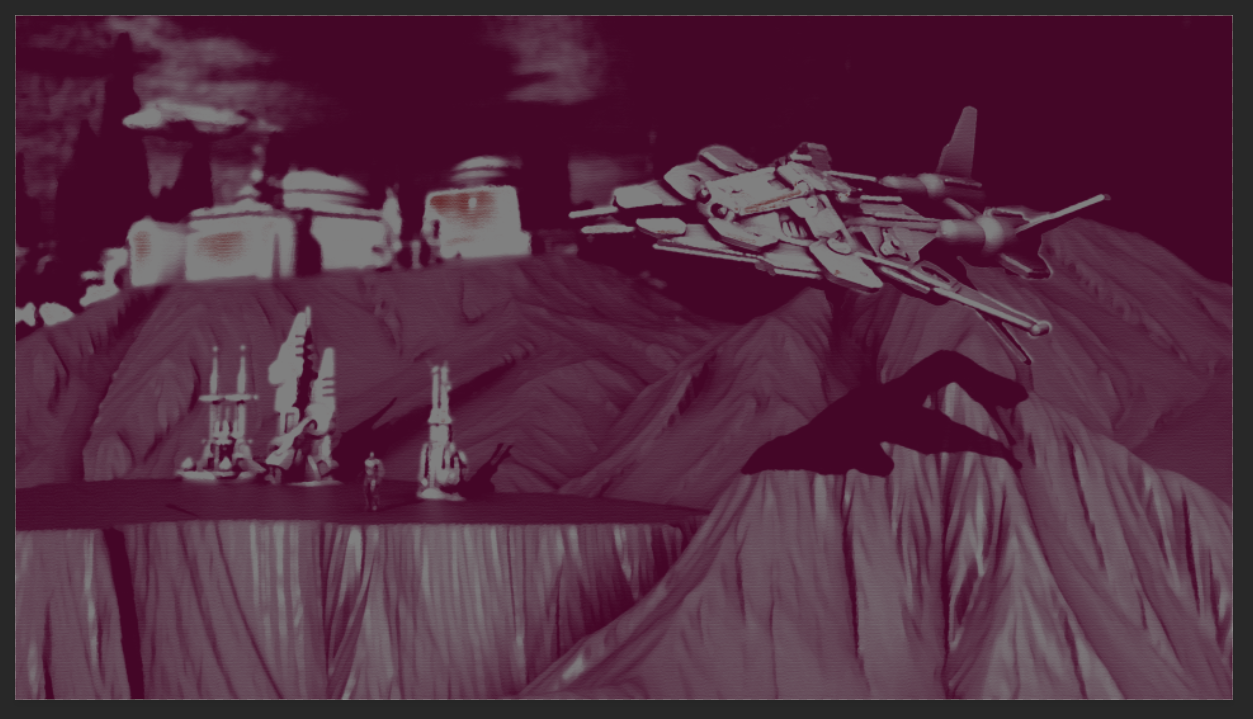
Finally, I added details. I added a grid in the background using a pattern fill with glows, and used the toonline render with blurs as well as a mask on a pink color.


Details Added

Final

Sunday, September 13, 2020

Legos Project Part 01

 For this project, we need to reference a lego creation and basic lego brick models to model the bricks needed, and then in Unreal recreate the design fully assembled, with materials and lighting. This week, I modeled the Lego bricks needed. I went with this spaceship design.

I started each piece with a cube.

Then, I used the preexisting lego bricks as a reference, snapping the vertices of the bricks I made to the grid to match the scale of the other models.

Using existing pieces as reference

Using existing pieces as reference

No Bevel

Beveled


Once I had the preliminary shapes of each brick modeled, I went back and added detail by beveling the edges.


Grave of the Fireflies: Sprint 12

 In this sprint, I helped create a new introductory level that precedes the main experience. I created the sequencer, adding in the introduc...